This post may contain affiliate links which means I will get a commission if you make a purchase at no additional cost to you. As an Amazon Associate I earn from qualifying purchases. Please read my disclosure for details.
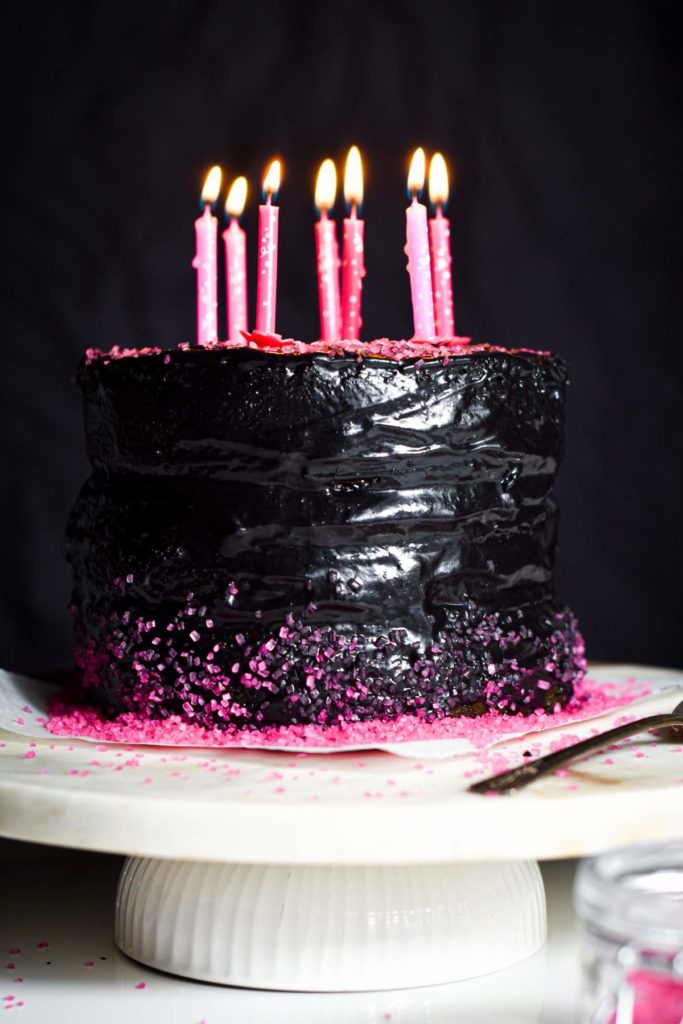
This black velvet cake recipe is perfect for Halloween! It’s a super moist black velvet cake in luscious chocolate marshmallow frosting. So easy and scary good!

WANT TO SAVE THIS RECIPE?
This moist black velvet cake recipe will make any chocolate lover scream with joy.
Red velvet cake gets a dark makeover, turning it into the perfect Halloween cake.
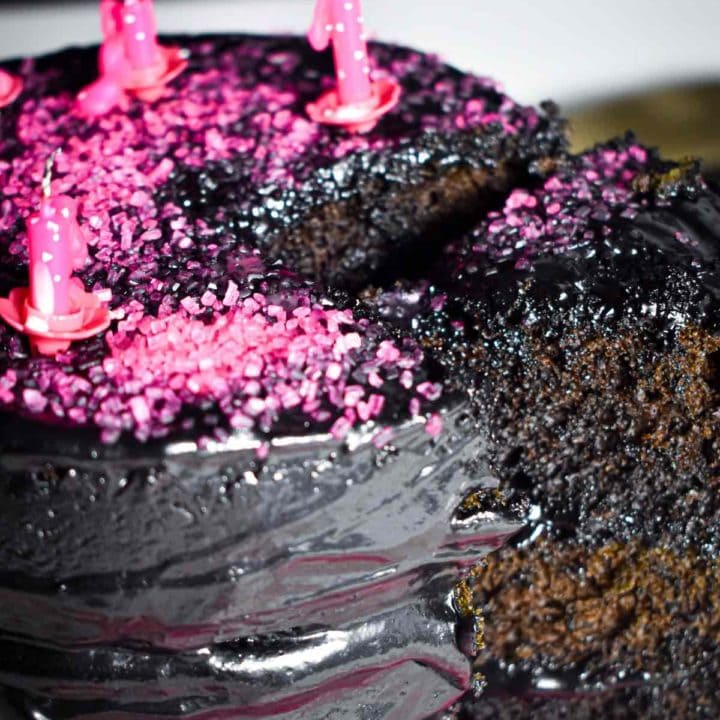
It’s made with cocoa powder and dressed in rich chocolate marshmallow frosting. Everything comes together so easily, and before you know it, your black velvet chocolate cake is ready to be devoured.
What Is Black Velvet Cake?
Sink your fangs into a devilishly good treat this Halloween.
Black velvet cake is a chocolate cake inspired by a classic red velvet cake recipe. To make this Halloween-ready treat, you’ll need familiar red velvet cake ingredients like cocoa powder, buttermilk, and vinegar.
Instead of red food coloring, we’ll tint the black velvet chocolate cake and fluffy frosting with black food coloring. And even though this is a velvet cake recipe, we’ll use chocolate marshmallow creme frosting, not cream cheese frosting.

The result is a chocolate overload cake that’s super light and moist.
So next time you see a message that says, “Come to the dark side, we have cake.”, they’re probably talking about this dreamy, decadent masterpiece. 🤤
Why You’ll Love This Recipe
- Better Than The Average Chocolate Cake: This black velvet cake recipe is like the combination of moist and tender red velvet cake and rich, chocolatey devil’s food cake. It’s the best of both (cake) worlds!
- Perfect For Halloween: Nothing screams Halloween more than a dark, sweet treat. You can also decorate your black velvet cake with frightfully fun toppings. (Scroll down a bit more and discover how to turn Oreos into spiders! 🕷️)
- Fun And Easy To Make: There is nothing tricky about this treat. Everything from mixing the batter to decorating is fuss-free!
What Does Black Velvet Cake Taste Like?
Even though this black velvet chocolate cake is super moist and fudgy, you don’t need to be frightened by its richness.
You’ll get the old-fashioned chocolatey goodness in every slice because we used natural cocoa powder, not Dutch-process.
The bolder flavor of natural cocoa powder is perfect for our dark dessert. It complements the fluffy chocolate marshmallow frosting, and the melt-in-the-mouth texture of the cake is simply divine. 😋

You’ll also notice that this black velvet cake recipe includes coffee, which is like the supporting cast member to our main star: chocolate.
And because this is a velvet cake, its texture is incredibly light and soft (thanks, buttermilk and vinegar!)
So if you’re like me, who often overlooks traditional chocolate cakes because they’re sometimes too heavy, then you’ll like red velvet’s fiercer cousin.
What Is Black Velvet Cake Made Of?
Black velvet cake:
- Cake flour – This makes our black velvet cake, well, velvety.
- Unsweetened cocoa powder – For a more concentrated chocolate flavor on our Halloween-ready cake.
- Baking powder – Helps make this moist black velvet cake light.
- Kosher salt – Balances the sweetness of the cake.
- Unsalted butter – Adds flavor and makes our cake nice and tender.
- Granulated sugar – To sweeten our black velvet chocolate cake.
- Eggs – To bind the cake batter and prevent dry cakes. No crumbly chocolate cake here!
- Pure vanilla bean paste – You can also use vanilla extract.
- Freshly brewed coffee – A must in any chocolate cake recipe! Coffee enhances the chocolate flavor for an ultra-rich treat.
- Buttermilk – This key ingredient makes velvet cakes lighter and fluffier than most cakes!
- Half and half – We’ll use half and half in place of milk for our moist black velvet Halloween cake.
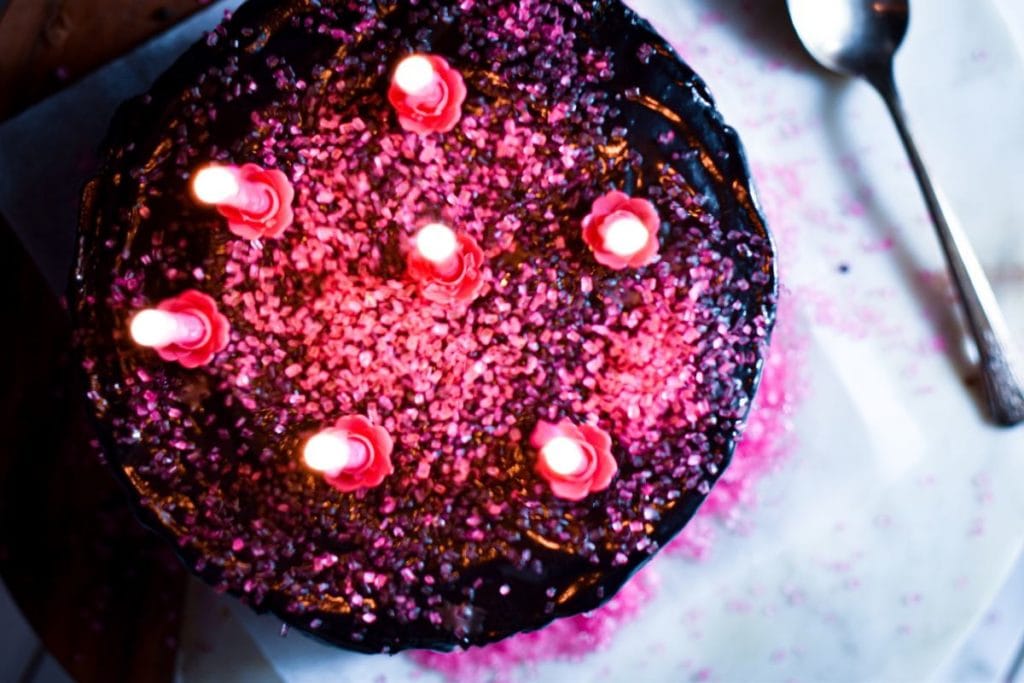
- Black food coloring – We’ll add a tablespoon or two to darken our decadent dessert further. After all, it should be worthy of being our Halloween party’s centerpiece, right?
- Baking soda – Make sure your baking soda is not beyond its shelf life, or it won’t be as potent.
- Distilled white vinegar – Baking black velvet cake can feel like a science experiment when you mix baking soda and vinegar. But more than the fizzy show, this combo also creates a better rise for the lightest, melt-in-the-mouth cake.
Chocolate marshmallow frosting:
- Marshmallow creme – You can also decorate your black velvet Halloween cake with any frosting, but marshmallow creme’s sweetness and fluffiness are perfect with the deep chocolate flavor of this recipe.
- Unsalted butter – For our fluff buttercream.
- Confectioners’ sugar – To sweeten the chocolate marshmallow frosting. Note that we’ll use confectioners’ sugar for easier blending.
- Semi-sweet chocolate – You can use any chocolate of your liking.
- Pure vanilla extract – Because fluff buttercream frosting just tastes incomplete without a touch of vanilla.
- Heavy cream – To adjust the consistency of your frosting.
- Black food coloring – I’ve also shared an ingredient below for those who don’t want to use black gel food coloring on their black frosting.
- Sprinkles – For decorating the Halloween black velvet cake. I think pink sprinkles make our dark cake wickedly cute!
Tools Needed To Prepare Black Velvet Cake
- Bowls for combining the ingredients
- Strainer for sifting the dry ingredients
- Stand mixer for combining the black cake batter
- Wire wrack for cooling the cake layers
- Offset spatula for spreading the frosting onto the cake
- Serrated knife for trimming the cake layers
- Cardboard cake round for stacking the cake layers together
- Round cake pan for baking the cake
Ingredient Additions & Substitutions For Black Velvet Cake Recipe
Buttermilk substitute
Don’t have buttermilk on hand? You can substitute it with milk and vinegar for this moist black velvet cake recipe!
Just combine whole milk with a teaspoon or two of vinegar.

Food coloring gel substitute
Did you know you can achieve a gorgeous, deep, dark color on your chocolate marshmallow frosting without using food coloring gel?
Instead of semi-sweet chocolate, use black cocoa powder!
This also doesn’t stain the teeth!
Spider cookie topping
Instead of candy sprinkles, let’s make this black velvet chocolate cake more frightfully fun with spider cookies on top! All you need is to separate Oreo cookies, cut licorice laces into 8 sections for the spider legs, and stick them onto the Oreo bottom halves with melted chocolate.
Then, reconstruct the Oreos and decorate the spider cookies with candy eyes and red icing. You can have kids help you with these cute spiders!

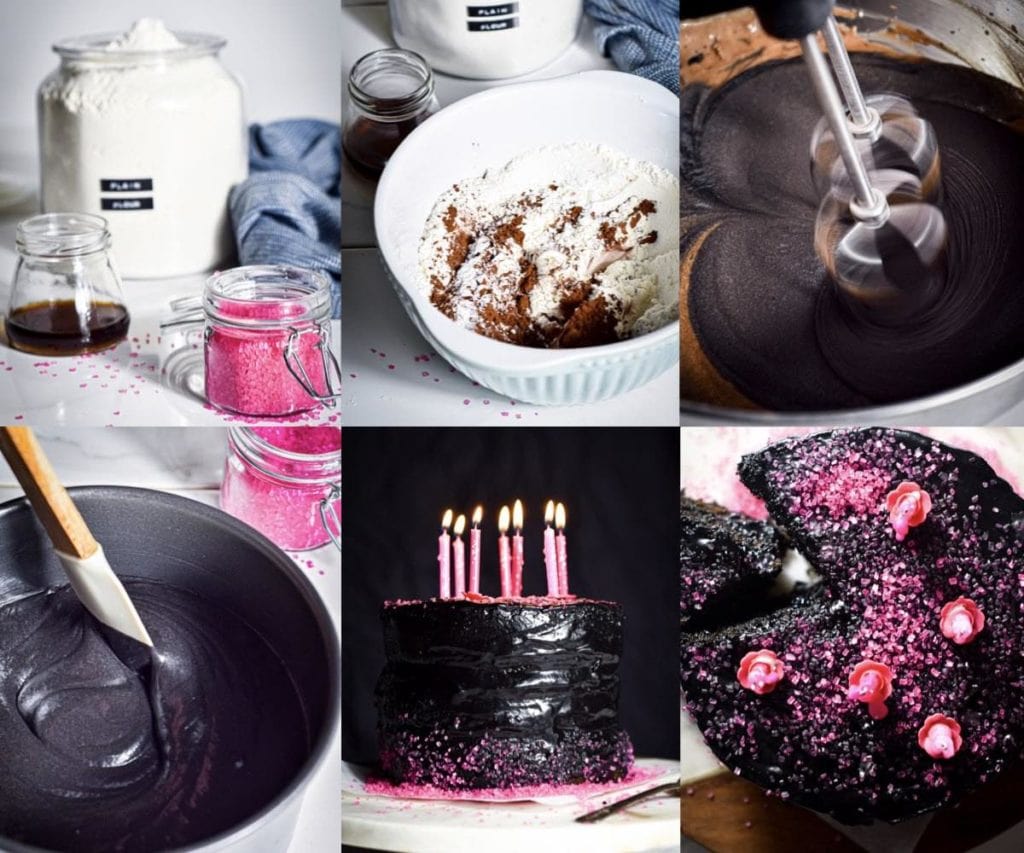
How to Make Black Velvet Cake
Ingredients:
For the black velvet cake:
- 2 1/4 cups cake flour
- 2 tbsp unsweetened cocoa powder
- 1 tsp baking powder
- 1/2 tsp kosher salt
- 1/2 cup unsalted butter, room temperature
- 1 1/2 cups granulated sugar
- 2 large eggs, room temperature
- 1 tsp pure vanilla bean paste
- 3 tbsp freshly brewed coffee, room temperature
- 1/2 cup buttermilk
- 1/2 cup half and half
- 2 tbsp black food coloring
- 1 tsp baking soda
- 1 tsp distilled white vinegar
For the chocolate marshmallow frosting:
- 1 7-ounce jar marshmallow creme
- 2 tbsp unsalted butter, room temperature
- 1/2 cup confectioners’ sugar
- 2 oz semi-sweet chocolate, melted and slightly cooled
- 1 tsp pure vanilla extract
- 3 tbsp heavy cream
- Black food coloring
- Sprinkles for decorating
Tools you need:
- Bowls
- Strainer
- Stand mixer
- Wire wrack
- Offset spatula
- Serrated knife
- Cardboard cake round
- Round cake pan
Instructions:
Black velvet cake:
STEP 1: Preheat the oven to 350°F. Place the rack in the center.
STEP 2: Butter and flour the cake pans.
STEP 3: Sift the dry ingredients into a small bowl. Set aside.

STEP 4: In a separate bowl, beat butter and sugar with the stand mixer’s paddle attachment. Cream on medium speed for 3 minutes or until fluffy and pale.
STEP 5: Scrape down the sides of the bowl. Add one egg at a time and mix on medium-low speed until incorporated.
STEP 6: Add the vanilla bean paste and coffee. Mix on medium.
STEP 7: In another bowl, combine the buttermilk and half and half.
STEP 8: Mix the dry ingredients into the wet ingredients in 4 increments, alternating with the buttermilk mixture on low speed. Remember to start and end with the dry ingredients.
STEP 9: Once the batter is combined, turn the mixer off and scrape down the sides of the bowl.
STEP 10: Set the mixer on low and add the black food coloring until you get your desired shade.

STEP 11: In another bowl, combine the vinegar and baking soda. Add it to the batter and beat for 10 seconds on medium speed.
STEP 12: Turn the mixer off and pour the black velvet cake batter into the prepared cake pans.
STEP 13: Bake for 20 to 30 minutes, or do the toothpick test to know if the cake layers are done.
STEP 14: Remove the pans from the oven and allow the cake layers to cool for 10 minutes. Then, remove the cake layers from the pans and cool completely on a wire rack before you frost and assemble your cake.
Chocolate marshmallow frosting:
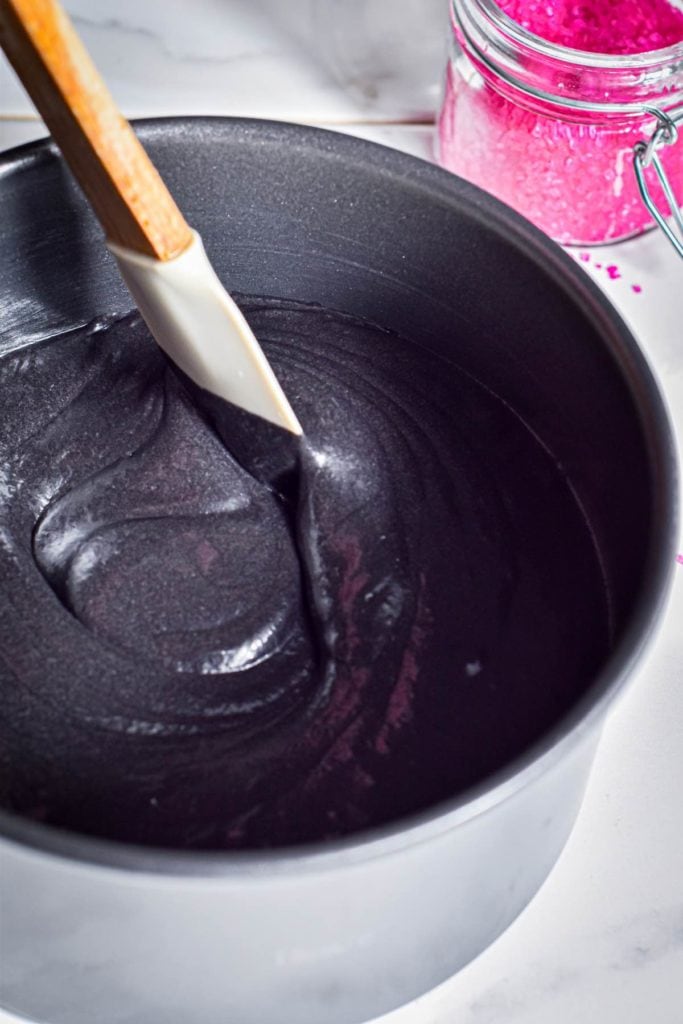
STEP 1: Add unsalted butter, sugar, melted chocolate, and vanilla extract to the marshmallow creme. Mix with a spatula until combined.
STEP 2: Add a tablespoon of heavy cream at a time until the frosting is smooth and spreadable. Tint the frosting with black food coloring gel until you achieve your desired shade.
Assembling the Halloween black velvet cake:
STEP 1: Trim the domed part of the cake layers with a serrated knife to level them. Cut each layer in half so you have four cake layers.
STEP 2: Dab some frosting in the center of a cake round. Place a cake layer over it.
STEP 3: Add 3 tablespoons of chocolate marshmallow frosting onto the layer and spread it evenly with an offset spatula. Leave a 1/4-inch border around the edges.
STEP 4: Stack your cake together, making sure the layers are aligned.
STEP 5: Add 1/2 cup of frosting to the center of the top layer. Spread it smoothly and evenly over the top and sides of the cake. Do not worry about perfecting this! You can cover some areas with sprinkles and other fun decorations.
STEP 6: Place your decorated black velvet cake in the fridge for 30 minutes before serving to let it set. Slice and enjoy!
What To Serve With Black Velvet Chocolate Cake
This moist black velvet chocolate cake will be amazing with coffee!
If you want to give your guests a sugar rush, serve it with a scoop of salted caramel ice cream.
Have you already planned your dessert table for your Halloween party? If not, I have other fun and spooky sweets to delight your guests.
Try our Oreo bat cupcakes and monster pretzels! They’re super easy to make, and you can even set them up as activities for kids.

If your sweet tooth wants more, you might like these Halloween desserts.
Tips About Making Moist Black Velvet Cake Recipe
- To make mixing easier, bring your chilled ingredients to room temperature first. A smooth batter is key for a cake that bakes evenly!
- Do not overmix your black velvet cake batter, or it’ll end up dense. Mix just until everything is combined so your cake will come out light and tender.
- Evenly distribute your batter into the pans as much as possible. Also, do not overfill the pans, or the cakes won’t bake evenly, and some might even sink in the middle.
How To Store Black Velvet Chocolate Cake
- Fridge: Got leftovers? Store them in an airtight container, and they should keep well in the fridge for up to 5 days! I recommend taking the cake out of the fridge for at least 15 minutes before serving so it’s soft and velvety.
- Freezer: You can freeze your black velvet cake for up to 2 months. Just wrap it in plastic wrap and foil. Then, thaw to room temperature.
What’s the Difference Between Red and Black Velvet?
Black velvet cake vs red velvet cake, how do they differ?
The easiest way to compare the two is with the amount of cocoa powder you’ll need for each cake.
Black velvet cake is made with more cocoa powder than its red sibling. Therefore, red velvet cake has a milder flavor than black velvet cake.
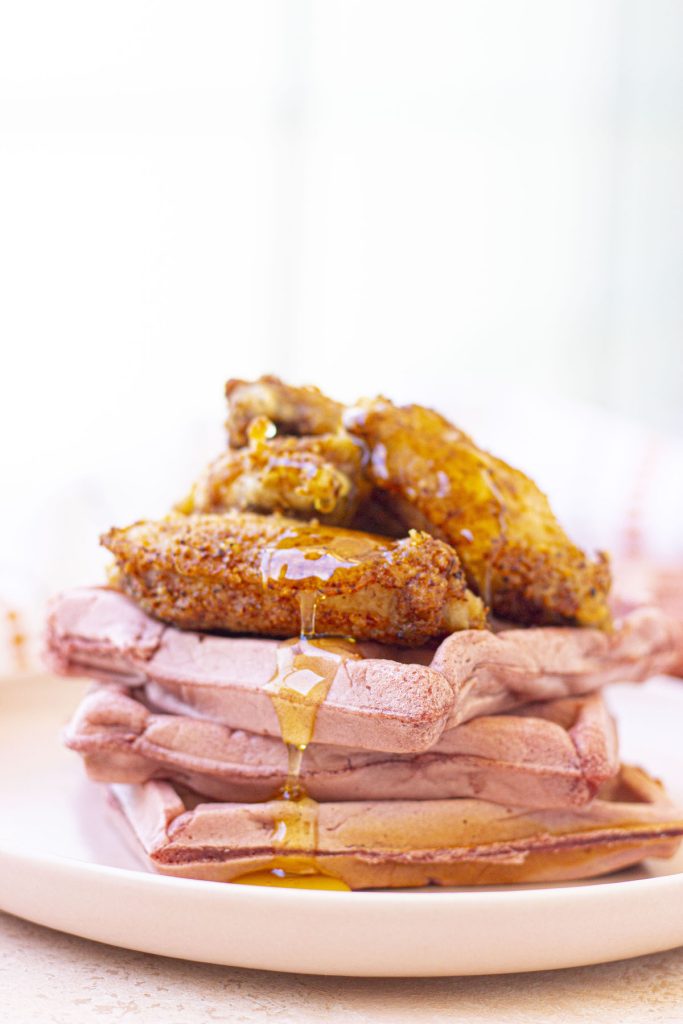
Oh, and speaking of red velvet, did you know you can enjoy this beloved cake flavor in the form of pancakes?
Here’s an easy red velvet pancakes and chicken recipe!
How to Make a Black Cake
The easiest and tastiest way to make a black cake without pumping the batter with food coloring is with black cocoa powder. Alternatively, you can just bake any chocolate cake and then decorate it with jet-black frosting.
How to make black frosting without black food coloring? Why jump through hoops when you can just use black cocoa powder on a basic buttercream recipe?
Beat butter until fluffy, add sugar and black cocoa powder, mix, beat in some whole milk, maybe add some vanilla extract, and you’re done!
This black frosting recipe will also taste delicious in our black velvet cake recipe above. 😋
And if you love dark, chocolatey desserts like this black chocolate cake, you might like our double chocolate banana bread! This reminds me of a dark chocolate cake.

FAQ About Black Velvet Cake
What flavor is black velvet cake?
Black velvet cake tastes like chocolate. If you made it with black cocoa powder, you might also notice that it tastes similar to an Oreo cookie.
Can I make a vegan version of this black velvet cake?
Yes! For a vegan black velvet cake, swap the dairy ingredients with plant-based alternatives. Try soy milk and vegan butter, for example.
What alternatives are there to buttermilk?
The easiest alternative to buttermilk is, well, homemade buttermilk! Just combine milk with a tablespoon or two of white vinegar or lemon juice. Let the mixture sit for 5 minutes, and it’s ready for this recipe.
Is there a substitute for marshmallow creme in the frosting?
Don’t have marshmallow creme? You can make your own with egg white, light corn syrup, salt, powdered sugar, and vanilla extract! Beat the first three on high, add the sugar, and then the vanilla extract.
Can I freeze the cake layers?
Sure. After cooling the cake layers, wrap each cake in plastic wrap and foil. You can freeze them in a freezer-safe container for up to 3 months. Then, just thaw the cake layers in the fridge overnight before use.
Can you turn red velvet cake mix into black velvet?
Red velvet cake uses less cocoa powder than black velvet cake, so turning a red velvet cake mix into a black velvet cake might not give you the flavor you want. It might be easier to turn vanilla cake mix into a black velvet cake!
Black Velvet Cake
This black velvet cake recipe is perfect for Halloween! It's a super moist black velvet cake in luscious chocolate marshmallow frosting. So easy and scary good!
Ingredients
For the black velvet cake:
- 2 1/4 cups cake flour
- 2 tbsp unsweetened cocoa powder
- 1 tsp baking powder
- 1/2 tsp kosher salt
- 1/2 cup unsalted butter, room temperature
- 1 1/2 cups granulated sugar
- 2 large eggs, room temperature
- 1 tsp pure vanilla bean paste
- 3 tbsp freshly brewed coffee, room temperature
- 1/2 cup buttermilk
- 1/2 cup half and half
- 2 tbsp black food coloring
- 1 tsp baking soda
- 1 tsp distilled white vinegar
Instructions
Black velvet cake:
- Preheat the oven to 350°F. Place the rack in the center.
- Butter and flour the cake pans.
- Sift the dry ingredients into a small bowl. Set aside.
- In a separate bowl, beat butter and sugar with the stand mixer's paddle attachment. Cream on medium speed for 3 minutes or until fluffy and pale.
- Scrape down the sides of the bowl. Add one egg at a time and mix on medium-low speed until incorporated.
- Add the vanilla bean paste and coffee. Mix on medium.
- In another bowl, combine the buttermilk and half and half.
- Mix the dry ingredients into the wet ingredients in 4 increments, alternating with the buttermilk mixture on low speed. Remember to start and end with the dry ingredients.
- Once the batter is combined, turn the mixer off and scrape down the sides of the bowl.
- Set the mixer on low and add the black food coloring until you get your desired shade.
- In another bowl, combine the vinegar and baking soda. Add it to the batter and beat for 10 seconds on medium speed.
- Turn the mixer off and pour the black velvet cake batter into the prepared cake pans.
- Bake for 20 to 30 minutes, or do the toothpick test to know if the cake layers are done.
- Remove the pans from the oven and allow the cake layers to cool for 10 minutes. Then, remove the cake layers from the pans and cool completely on a wire rack before you frost and assemble your cake.
Chocolate marshmallow frosting:
- Add unsalted butter, sugar, melted chocolate, and vanilla extract to the marshmallow creme. Mix with a spatula until combined.
- Add a tablespoon of heavy cream at a time until the frosting is smooth and spreadable. Tint the frosting with black food coloring gel until you achieve your desired shade.
Assembling the Halloween black velvet cake:
- Trim the domed part of the cake layers with a serrated knife to level them. Cut each layer in half so you have four cake layers.
- Dab some frosting in the center of a cake round. Place a cake layer over it.
- Add 3 tablespoons of chocolate marshmallow frosting onto the layer and spread it evenly with an offset spatula. Leave a 1/4-inch border around the edges.
- Stack your cake together, making sure the layers are aligned.
- Add 1/2 cup of frosting to the center of the top layer. Spread it smoothly and evenly over the top and sides of the cake. Do not worry about perfecting this! You can cover some areas with sprinkles and other fun decorations.
- Place your decorated black velvet cake in the fridge for 30 minutes before serving to let it set. Slice and enjoy!
Notes
- Mixing your cake butter until smooth is key for a cake that bakes evenly! Make sure your chilled ingredients are at room temperature before using them in the batter.
- Do not overmix your black velvet cake butter because it can lead to a dense cake. Mix just until combined for a perfectly light and tender cake.
- Distribute your cake batter evenly into the pans, and don't overfill them. Otherwise, they won't bake evenly, and you risk having a layer that will sink in the middle.
* Cake recipe adapted from bon appetit.
* This recipe was originally published on 10/2011 by Jaclyn. Notes and photos updated on 10/2023.
Nutrition Information:
Yield: 8 Serving Size: 1Amount Per Serving: Calories: 558Total Fat: 51gSaturated Fat: 31gTrans Fat: 0gUnsaturated Fat: 17gCholesterol: 154mgSodium: 55mgCarbohydrates: 27gFiber: 0gSugar: 19gProtein: 2g
* Please note that all nutrition information are just estimates. Values will vary among brands, so we encourage you to calculate these on your own for the most accurate results.
Conclusion
If you want a scary good time this Halloween, this black velvet cake is the perfect cake for you!
It combines the richness of devil’s food cake and the super moist and light texture of red velvet cake.
Cocoa powder gives this black velvet cake a deep, chocolatey flavor, and in between each layer and all around the cake, you’ll get the creamy and oh-so-dreamy chocolate marshmallow frosting. Halloween is really the best day if you have a sweet tooth!
So what are you waiting for? Grab a slice of this sinfully delicious dessert!
For more food ideas this spooky season, you might like these Halloween appetizers. Don’t know where to start? Here are some of my favorite sweets and snacks:
When do you add the 1/2 cup of half and half? This is missing from the instructions.
Thanks for catching that Becky. For step #8, Combine the buttermilk and half & half (not vanilla) in a small bowl or glass.
Just an FYI In the ingredients list for the cake A half cup of half-and-half is required but in the instructions there is never a mention of the half and half. Please explain
Oops! Thanks for catching that. I just fixed the instructions. It should be combine the buttermilk and half & half in a small bowl or glass (step #8).